Thursday, 15 December 2011

Time for CAD/CAM

During the night i created the model using solidworks. This is a 3D modeling program. Once a model has been built you have the ability to save the model as an .STL file. This can then be transferred to a rapid-prototyping machine or 3D printer. All the measurements of the wooden model were replicated on the 3D modeling software. The only difference was that this time i created a slot in the bottom half of the upper part of the model, This would allow both parts to be prepped separately before being glued together and sprayed.


Now it was time to print the parts. The pieces were fed into the rapid-prototyper and left to build the model. I made sure that both parts of the model were built to be 5mm thick. This would mean that the pieces could be sanded without breaking the model.
The model took 9 hours to print, so the next day i was able to start on the finishing of it.


Wednesday, 14 December 2011

Filler filler and more filler

So its time to give up my life and spend the next few weeks sanding. This is because I'm going to have to coat the ENTIRE model in filler and sand it back down to a high quality, even finish. So it begins. Filler is applied to the top of the model, this allows me to hold the handle with my left hand and attempt, i say attempt because i was useless at it. attempt to skim a fine but even layer of filler onto the surface of the model.
 

As you can see it looks more like a Mr Whippy Ice-cream than a futuristic device. So i spend all day skimming, waiting for it to dry and then sanding before repeating the process. The handle and botom of the model is dont in the same fashion untill we have what looks like a giant blob of blutak
 This Took the best part of three days to get to this stage. The problem with it is that you cannot get a smooth surface by simply slapping the filler on, it's not possible. you have to put some on, Sand it down, find any gaps and then apply more. Now this stuff dries like plaster, so you can imagine the time it takes and the dust it creates. 
At this point i realised i was going to have to make a rather important decision. Did i continue sanding and filling and loose more time on my other projects or did i use CAD/CAM.

Now if you do not know we have a thing called a rapid prototyper in EdgeHill. This lovely piece of equipment looks like an instant coffee machine but can actually print 3D models. While sitting and sanding i worked out that i could probably design the model on 3D software that night and feed it into the machine the next day. This would stop me wasting my life and lungs sanding.


First Spray and a chain of terrible mistakes...

So, my model had been sealed, hopefully i would not see any grain through my first coat of paint. It was time to spray the first coat of primer. the model was placed in a small hand vice between some modelling foam to protect it from the metal jaws.

This was it, the moment of truth. I sprayed the top half of the model and left it in the vice for a few hours until it was touch try. The model was removed from the vice and placed on a piece of modelling foam so i could spray the underside and handle. Again it was sprayed and then removed from the spray booth and left in a safe place to dry.

The next day i was excited to see if the last 4 weeks of work had paid off....... It hadn't.

The paint had stuck to the modelling foam so the two were attached. once this was carefully removed it was obvious that the foam had also at some point had some black writing printed on it. This writing had decided to remove itself from the foam and make the surface of my model its new home.


To top it off the grain was more than slightly obvious through the primer. Total disaster. I decided to sand down the model to remove the black marks and try again this time being more careful about what i put it on to dry.

So second try, again sprayed, left to be touch dry and sprayed the other half. Came back the next day to be greeted with the picture below.


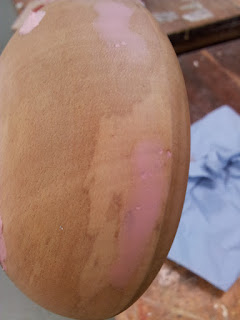
Still more grain, which would have to be filled and for some reason the paint was still tacky. Mmmmm perhaps its this plasticote rubbish i bought from a hardware store i cannot mention, Lets call them Q&B. So i decided to place the model on a radiator and come back the next day. Next morning and we still have the tackiness, not as bad but still tackiness. The next day still about the same, Day 4 and i'm getting annoyed with this so i blast it with a hot air gun for 20 mins. This doesn't do anything to the paint but does keep me warm for a bit. At the end of the day and after a long conversation with Mr Wooff we agree that the best thing will be to coat the entire model with a thin layer of filler as it is probably the sealing mixture reacting with the paint.


Linseed and Acetone....

To seal the wood i used a 50/50 mix of linseed oil and acetone. The story behind this concoction was that i had been advised to use a acetone based sanding sealant, but it was not possible to find one . Some research on the net showed that model makers working with Jelutong used a 50/50 boiled linseed and spirit mix to seal their wood. I already had raw linseed oil as i play cricket and it is used to maintain the "spring" in a cricket bat. I found out (purely through chance) that ASDA actually sell pure acetone over the counter mainly for removing false nails. i thought this would be a good replacement for the spirits part of the mix as the only pure spirits i could get hold of was purple stained meths and i was worried about the added colouring ruining the wood.

So i mixed up a small batch and started to experiment with some scrap pieces of wood. these were rubbed with a wet rag of the mix and left on a radiator to evaporate away. The results were pretty pleasing so i went agead and rubbed down my model with the mix, again leaving on a radiator to evaporate off before repeating. This was done three times in total.


And then i droped it again. Right onto the lid containing the mixture. You see the problem with oils are that they make things slipery and while trying to take a picture with my other free hand the model again decided to take a little jump
So this meant some more filling, waiting sanding and then coating again. but eventually i got there


First feel & tidying up

Unfortunately, while trying to force the model into the vice with one hand , stop two pieces of foam escaping with the other hand and tighten the vice with my 3rd non existent hand. My fourth hand didn't manage to catch my model as is attempted to make a dash from the vice to the floor and i subsequently ended up with some sizeable dints in the top of it. Not to put a dampener on things i returned to the model the next morning and removed it from the vice. The model felt and looked good and strong and was a very tactile piece.

But anyway no time for relaxing, There was a small gap between the handle and the top part and a few dents and scraped from where it had bounced off the concrete floor, these would have to be rectified. To do this I used a 2 part car body filler. Basically its a putty that you mix with a small abount of hardener, these two items chemically react with each other, heat up and start to harden. after about 20 minuted to filler is hard enough to sand down and work with. 
 
  
So this became a long drawn out process over a few days of mixing the filler, filling the crack, waiting for it to dry and then sanding it back down. Again as with the wood the sanding is done with progressively finer grades of paper to achieve a smooth and consistent finish.
Eventually i was happy and it was time to seal the wood


Construction

Next stage is to put the two pieces together. For this stage i faced a problem. i had one curved surface and i was connecting it to one flat surface. Well this is where sanding comes into its own again. As the top half of the product curves over 2 planes (like a ball) i would have to try and replicate this same indentation on the top face of the handle so allowing a larger contact area and hopefully a smaller gap when finished. 30 minutes of sanding later it was time to join the two. I decided to use a dowel joint, this would give me the stability without being an over complicated joint. This did however mean some drilling, precise measurements, luck and pure guess work.
After finding the centre of the handle and marking two points that were not too close to the edge, two holes were drilled. The holes were drilled at an angle down the handle as the handle curves and i didn't want to drill through the handle and out the side. Screws were placed in the holes and then the handle pressed against the pre drawn alignment on the top piece. This left slight impressions for the corresponding holes on the other piece. Again the holes had to be drilled at the same angle as the holes in the handle so the dowel rods that would be inserted would allow the two surfaces to meet. (this was the guesswork bit) Once drilled 6mm dowel was glued in the handle and checked against the top piece. Unfortunately there was a rather large gap (because of the guess work  ) between the two pieces. To solve this i re drilled one hole at a slightly steeper angle, this solved the problem. glue was then placed on the other holes, the two pieces mated and finaly pressed together in a vice. Modelling foam was used to minimise damage to the wood model.

Sunday, 4 December 2011

Continuing the build

The next step is to glue the two halves together. this was done with good old PVA and then put under some pressure while it set.

While the main body was setting it was time to have a play with the shape of the handle.


Handle Prototype 1
For the handle i again used a piece of Jelutong. Quite simply i wanted to try a slowly tapering design, a rough curve was drawn on the wood and the curve cut on the band saw.

Sand / Glass paper was used to round off the edges and give a better profile to the shape. The result was as follows:


The squareness of the shape and the depth of the upper part of the grip made it quite uncomfortable to hold. from this design i went on to create a second handle using the same techniques. This time i maintained the curve at the front of the grip but also repeated the curve at the back making the handle a uniformed width down its entire length. Handle 2 looked like this.
This was a much more comfortable shape due to its thickness and was the design that i decided to take forward.